A Comprehensive Guide to Planting the DaylilyTime to divide: After the plant has been in the ground 4 to 5 years flowering will diminish if they are not divided. Best times are either early spring, when they leaves first emerge or shortly after they have finished blooming.
Foliage – If dividing after blooming, cut the foliage down by half. Removal –Using a shovel, loosen the soil by wiggling the shovel side- to- side while circling the plant about 6” from the outer edge of the plant. Once you have circled the plant completely use the shovel to dig a little deeper. Observe and feel for the tuberous roots of the plant, do your best not to cut through them as you dig. Gently pry the plant out of the ground. Division – Put the dug up daylily on the lawn area or a tarp. For plants in the ground only 3-4 years use your hands and a hori knife, to separate the tuberous roots. If the plant has been in the ground for a longer period using two pitch forks split the plant will result in less damage to the roots. Split the plants into pieces with 4 to 5 fans of foliage. Re-Planting – Now is the time to improve that soil! Clean the hole you dug the daylily up from, remove any broken roots, leaf litter and stones. Add compost. Re-plant your daylily. Take note of the base of the foliage, it will show you how deep to plant. The lighter green at the base of the stem should be just under the soil surface. Transplanting – Now is the time to spread your daylily around your garden or pot it up as a gift for a fellow gardener. FOR ALL DIVISIONS – do this for all plants you divide Mulch – Don’t forget to mulch the area of soil you disturbed – weeds will seize the opportunity to get a foot hold. Water – As soon as you have finished mulching. Remember, these are not water lilies so don’t flood the hole. Add a little water, wait a few minutes, water again. Then… water at least once a week, more often in nature isn’t providing. Hosta Time to divide: After the plant has been in the ground 3 to 4 years. Best times are either early spring, when the leaves first emerge, or shortly after they have finished blooming. August is the best time of year to divide as the plants have finished flowering and are beginning to store nutrients in their roots. Plants put most of their energy to building roots during the fall. Foliage – can be tied up on large hostas to get it out of the way of the dividing shovel. Removal –Using a shovel, loosen the soil by wiggling the shovel side- to- side while circling the plant about 6” from the outer edge of the plant. Once you have circled the plant completely, use the shovel to dig a little deeper. Observe and feel for the roots of the plant, do your best not to cut through them as you dig. Don’t worry if you cut the edges of the roots a little, hostas are resilient. Gently pry the plant out of the ground. Division – Once out of the ground, shake the soil off the roots, with large hostas, rolling them around to loosen the soil from the roots can work well. If the plant has been in the ground only 3 to 4 years you can more easily separate the plants by using your fingers to pull them apart. If it has been in the ground for many years a tool such as a Hori knife may be need to separate the plants. With a Hori knife you want to cut the crown of the plant in ½ then make additional cuts to divide the plant into smaller pieces. Each division should have a minimum of 3 to 4 leaves. You need not break up the plant into many small divisions, you can simply cut your large hosta in ½ and re-plant it, discarding the un-wanted second half. If you want to increase the number of hostas in your garden, then divide it into small piece and plant them out. Re-Planting – Now is the time to improve that soil! Clean the hole you dug the hosta up from, remove any broken roots, leaf litter and stones. Add compost. Re-plant your hosta. Take note of the base of the foliage, it will show you how deep to plant. The lighter green at the base of the stem should be just under the soil surface. Transplanting – Spread your Hosta around your garden or pot it up as a gift for a fellow gardener. Hosta’s come in many sizes, make sure to leave enough room for your new transplants. Don’t over crowd. Brown-Eye Susan’s (Rudbeckia) or other cone flowers such as Echinacea Time to divide: Many Rudbeckia and Echinacea plants spread to cover an area larger than the gardener had originally intended. These plants do not die out in the center as grasses and iris do, so dividing is really a process of reducing the amount of the plant. After the plant has been in the ground 3 to 4 years there is usually more plants then you wanted. Best times are either early spring, when the leaves first emerge, or shortly after they have finished blooming. Foliage – Can be tied up to get it out of the way of the dividing shovel. If dividing after they have finished blooming, cut the foliage down by half to get it out of way. Removal – You do not need to remove the whole plant from the ground. Simply identify the area where you want to remove the plants. Using a shovel push the stems and leave aside, then simply cut into the base of the plant and separate the division from the mother plant. Division – Once out of the ground, there is no need to remove the soil from the roots. Each division should have a minimum of 3 to 4 stems. Re-Planting – Now is the time to improve that soil! Clean the hole you dug the plant up from, remove any broken roots, leaf litter and stones. Add compost. Re-plant your brown eyed Susan’s. Take note of the base of the foliage, it will show you how deep to plant. The lighter green at the base of the stem should be just under the soil surface. Transplanting – Now is the time to spread your plants around your garden or pot it up as a gift for a fellow gardener. Plant the divisions 18” to 2’ away from each other and other plants. Grasses Time to Divide There are three general types of ornamental grasses common in the Connecticut garden:
Common warm season grasses:
Cool season grasses bloom early, and frost does not ruin the flowers. Many have flowers/seed heads that hang around through the winter. Here is a list of cool season grasses:
Evergreen grasses
When a grass opens in the center it is time to divide. Foliage – Can be tied up to get it out of the way of the dividing shovel. Removal –Using a shovel, loosen the soil by wiggling the shovel side- to- side while circling the plant about 8”-10” from the outer edge of the plant. Once you have circled the plant completely, use the shovel to dig a deeper. Observe and feel for the roots of the plant, do your best not to cut through them as you dig. With large grasses you may need to dig a trench around the plant in order to loosen the soil and roots. Pry the plant out of the ground. Smaller grasses can come out of the ground easily. Large grasses can require iron bars or iron pikes to pry the roots up. Division– Once out of the ground, use a very sharp shovel or an axe (for large grasses), cut out the dead center and discard. Cut the remaining clump up into smaller sections, a minimum clump size is about 6” across. Re-Planting – Now is the time to improve that soil! Clean the hole you dug the plant up from, remove any broken roots, leaf litter and stones. Add compost. Re-plant. Take note of the base of the foliage, it will show you how deep to plant. The lighter green at the base of the stem should be just under the soil surface. Transplanting – Now is the time to spread your plants around your garden or pot it up as a gift for a fellow gardener. Plant the divisions far enough away from each other and other plants so as not to over crowd. How far apart, depends on the size of the grass. Contact Growing Solutions for Help with your Planting Learn more about Re-Planting
0 Comments
A Guide to Planting Roses Correctly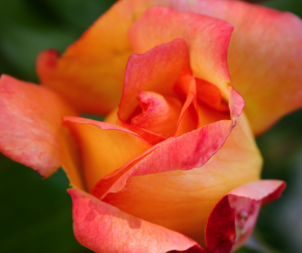 New easy care roses, beautiful, repeat blooming and fragrant – climbers, shrubs and ground covers are the essence of the June garden. Prior 2000, many landscape designers and home owners had stopped planting roses. They were “too much work”, “the leaves turn black and fall off”, “too many chemicals needed to make them beautiful”. The old fashioned roses needed too much care.
In 2000 along came a game changer, the ‘Knock-Out Rose’® a shrub rose, with many fragrant blooms and disease resistant foliage. The foliage looks healthy and glossy throughout the growing season. The flowers do not require dead heading, although they are more attractive if deadheaded. They have resistance to the common diseases of the old fashioned roses. Meaning they do not require the use of toxic fungicides to keep healthy and look beautiful. The ‘Knock-Out Rose’® re-blooms throughout the summer, fall and into winter. It starts blooming in mid-May and flowers strongly through late June. They take a summer holiday and begin blooming again in mid-August, where they again bloom for 5 to 6 weeks. Most gardeners would be thrilled with a plant that blooms for 10 to 12 weeks. But, they are not finished, the show isn’t over, resting through October, they often begin blooming again in mid-November where they can bloom until late December. I’ve deadheaded mine the day before Christmas as I didn’t want pink flowers next to my holly and red berries. Thorns, all roses have them, but the ‘Knock-Out Rose’® has fewer and they are large, so easily avoidable and they are less sharp than the thorns of other roses. What about color? I should have planted the ‘Knock-Out Rose’® a red rose with a full rose flower instead of the equally lovely ‘Pink Knock-Out Rose’® as they would look great next to my red holly berries in December. ‘Blushing Knock-Out Rose’® is pink with an open flower, ‘Pink double Knock-Out Rose’® is pink with a full rose flower, ‘Rainbow Knock-Out Rose’® is multi-colored with a yellow center and pink flowers, ‘Sunny Knock-Out Rose’® is the newest introduction a yellow rose shrub. Size, these are not small plants, these roses grow 3’ to 4’ high, and 3’ to 4’ wide. They have full foliage from the base of the plant and at the top surrounding the roses with lovely foliage. What about an easy care climbing rose? Last night, when closing a second story window I was delighted by the fragrance of our climbing rose ‘New Dawn’ drifting in on the night air. ‘New Dawn’ like the ‘Knock-Out Rose’® series is very disease resistant. When I plant these at clients homes I first construct a strong trellis or arbor as this is a big climber with strong stems. It grows to 12’ high or higher and 8’ to 10’ wide. It is a repeat bloom, blooming from mid- May through early July and again in September. The flowers are a delicate pink with a good rose fragrance. No room for such large roses in your garden? You will love the ‘Drift Rose’®, growing to only 18” high and 2’-3’ feet wide, these roses find a home in even the smallest of gardens. These are in the same family as the ‘Knock-Out Rose’® series and re-bloom with the same frequency. At clients’ homes I often plant these along front walkways or at the edges of larger planting beds. ‘Drift Rose’® comes in several colors, apricot, coral, peach, pink and red. Sun, all roses need full sun. In our front garden the ‘Knock-Out Rose’® have nearly full sun with dappled shade in the late afternoon. These roses are lovely, but to see what these roses can really look like see our roses in the back gardens, they have full sun, with southern and western exposure. Insects, all roses are food for the Japanese and Asiatic beetles, the most common pest of roses. The beetles appear at the beginning of July, and eat the rose foliage leaving large holes, in years of heavy infestation they can leave a rose nearly defoliated. Check roses beginning at the end of June and remove the beetles every day, the beetles are only around for about two weeks. To remove the beetles, pick them off and put them into a jar that you have filled with kitchen dish detergent and water. They drown in the soapy water and you have protected the beauty of your roses. Deer, they do eat the rose flowers, but not usually the foliage. In areas of very heavy deer browse problems the roses must be protected. The climbing rose is often a good choice as the deer only eat the lower branches. You will have roses at the tops of the climbers where the deer can’t reach. I’ve planted all of these roses in areas of moderate deer browse without protection and have found the deer are actually ‘dead heading’ the roses for us, while leaving us many blooms to enjoy. Fertilizer, roses need to be fertilized. My fertilizer schedule for roses starts in mid-March, I apply a ½ cup of Epsom salts, the kind you buy at the drugstore for soaking sore muscles. Sprinkle the ½ cup of Epsom salts on the soil surrounding the base of the rose plant. The Epsom salts contains magnesium sulfate. Both magnesium and sulfur are important nutrients for plants and roses especially respond to it. In mid-April I apply a rose fertilizer such as Espoma ‘Rose-Tone’, I apply it again in early July. Rose1Roses purchased in plastic pots can be planted in spring through the early fall. Planting them now and watering well through the summer will give you a reason to love roses next June. Read more on How to Plant Roses Right The Guide to Growing Strawberries in your Garden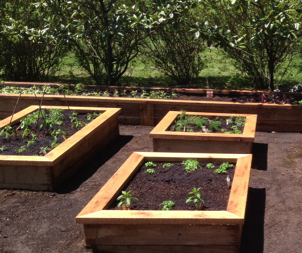 Just last night I picked our first crop of strawberries from the raised beds. The blueberry bushes in the edible garden are almost ready for harvest. June and July are berry time around here. This is the first of two articles on berries for the Connecticut garden. Strawberries are our first topic, followed by an upcoming article on growing blueberries.
Strawberries, the ones I picked last night are ‘Seascape’ variety. We’ve planted other varieties, but have been most pleased with this one. Strawberries suffer from many fungal diseases, ‘Seascape’ is remarkably resistant to these problems. The plants produce large berries ALL SEASON, starting in June and producing a light crop in mid-summer, and another heavy crop in September. Most strawberries are done by July, so you can see why this one has become a favorite. Planting strawberries in raised beds with compost enhanced soils will bring you success. If the soil or compost you are using is heavy, meaning it is dark and dense and holds water very well, you should add sand to the mix. Strawberries prefer a sandy loam soil, which water drains from quickly. Clay soils are not a good site for strawberry production. Raised beds are often made from cedar or other non-treated woods. Do not use pressure treated wood to create a raised bed for food production. At our garden we’ve used locally sourced black locust boards to create our raised beds. For many of our clients, we have purchased raised beds from www.naturalyards.com, and have been very pleased with quality and price of these products. We have also used steel edging and Belgium block stones to create raised beds in our gardens. We use chopped hay for mulch, commonly used when establishing new lawns. This hay mulch is not be confused with hay bales, if you use hay bales (horse food), you will end up with a great crop of hay! Hay mulch is sold in a plastic wrapped bale, it is weed and disease free. This mulch prevents fungal diseases in edible crops as it is naturally inhospitable to fungal growth. It also keeps the strawberries clean and free from sandy grit. Harvesting your strawberries daily is important, if left on the plant when ripe, birds, rodents and our dog will eat them! It is also important to remove any rotting berries, or brown leaves, as this will cause fungal diseases to spread. Do not compost strawberry waste. Strawberry plants are not easy to find in local nurseries, we purchased ours from the Burpee Seed Catalog online store at, www.burpee.com. They shipped us our plants, we followed the planting instructions in the package, and have been very pleased with the results. Where to plant? Full sun, well drained (no puddles), preferably in a raised bed When to plant? Order in February or March. Plant in Mid-May, can be planted up until September. If summer planting watering is critical. How far apart to plant? 2’apart. Strawberry plants create runners by the second year, these are new plants that reach out as a stem, touch the soil and form roots. The bed you plant them in should be big enough to allow for spreading. Divide them in the third year. Mulch? Yes, chopped hay mulch as described above is good, or other organic, non-dyed mulch will do. Do not use raw wood chips as mulch on fruit and vegetable plants. Water? Strawberries are sensitive to excessive water and dry spells. A raised bed will solve the drainage problem. If it is dry, water in the morning, do your best to water the soil and keep the leaves of the plant as dry as possible. Watering between rows works well. Avoid watering at night as leaved do not dry out quickly and fungus problems can occur. Fertilize? They prefer a pH of 6.0 to 6.3. Apply lime to the soil in February, especially if planted in a raised bed. As ‘Seascape’ produces berries spring to fall they need to be fertilized. We use Espoma Organic Garden-Tone in March and again in June. Read the package directions and follow them. Pests? Tarnished plant bug, slugs, rodents, dogs. Insects are not a big problem with strawberries, fungal diseases are the primary problem. Planting ‘Seascape’ or other disease resistant plants and keeping the beds clean of rotten berries and brown leaves is the best prevention. Extras? Plant at least 12 plants for a good harvest. The berries don’t freeze well, but they do make a wonderful jam or pie, or short cake… yum. Find out more about Planting Strawberries in Your Garden Years ago we planted one blue berry shrub, and were disappointed year after year with no berries. What was wrong? Part of my studies for my certificate in horticulture included fruit production, the light dawned, we needed more than one variety of blueberry! The cross pollination between the varieties produces the flower and berry. Some blueberry varieties are self-pollinating, but all will produce more with other varieties nearby. We planted high bush varieties and have been very happy with ‘Duke’ an early producer which grows to about 5’ high and wide. ‘Blueray’ is a mid-season producer of very sweet berries, it is a bit taller at 6’. Two smaller varieties we have been pleased with are, ‘Herbert’ and ‘Northland’. ‘Herbert’ grows to 4’ high and 5’ wide and is a late season producer. ‘Northland’ is 4’ x 4’, mid-season producer, a cross between a high and low bush shrub. Selecting shrubs for early, mid and late season production will extend the period of time the shrubs produce berries, thus extending the time we have fresh berries to eat. At a clients home we planted a hedge of a low bush variety called ‘Top Hat’. These shrubs grow only 18” high, we replaced a tired boxwood hedge with these beauties. Best part, the blueberries were toddler height, to the delight of the families youngest member. The difference between high bush and low bush varieties is size and in some varieties taste. High bush tend to be sweeter. Low bush berries are more tart, with intense blueberry flavor. What to plant? High bush, V. corymbosum, or low bush, V. angustifolium varieties. Bare root, or a shrub? Bare root are exactly what they sound like, a root with a leaf or two on it. These are inexpensive and easier to plant, but they have a high failure rate, and you will wait 3-4 years for a harvest. Shrubs are more expensive, they are much older plants, and are ready to produce a small crop the first year. Blueberry shrubs can be purchased a local nurseries and can be planted spring through fall. Where to plant? Full sun area, with moist soils. When to plant? If planting a shrub in a plastic container, plant March to November. If planting bare root, or a ball and burlap prepared plant, plant in early spring, Mid-March through May. How far apart to plant? Average high bush blue berries should be planted 4’ to 5’ apart. Low bush 2’ to 3’ apart. Mulch? Yes mulch the shrubs. Do not use raw woodchips or dyed mulch. Natural un-treated mulches are best. Fertilize? Yes, one product we have used and liked is Espoma Organic Soil Acidifier, ammonium sulfate will also do. Apply when planting according to package directions, in following years apply in early March. Pests? Birds, you must either get up very early and check your blueberries for ripeness every day, and be prepared to pick them, or the birds will beat you to it every time. Bird netting is a better option, put the net on when the berries form, keep it on until they turn blue and are ready to eat. Now, this is important, you must check bird netting every evening as birds can get caught under the netting and die. Bird netting can be purchased at nursery’s, farm supply stores and hardware stores. You can remove the netting once you have finished harvesting berries. Blueberries are not often harmed by insect or fungal diseases, reducing the need for pesticides and fungicides. Extras? Blueberries are attractive shrubs all summer with brilliant red or orange foliage in the fall. No need to plant them out of sight. Get help planting your strawberries! |
 RSS Feed
Reach us at (203) 403-6552 or Click for a Free Quote
|
|
Contact Growing Solutions Landscaping & Design
Email: paul@growso.com
Phone: 203-403-6552 Service Areas: Darien, Fairfield, Greenwich, New Canaan, Ridgefield, Rowayton, Southport, Stamford, Westport, Wilton and other neighboring towns in Fairfield County by request. |
Sitemap
|
©
Growing Solutions Landscaping & Design 2022